GOLANG面试八股文-并发控制
背景
协程A执行过程中需要创建子协程A1、A2、A3…An,协程A创建完子协程后就等待子协程退出。
针对这种场景,GO提供了三种解决方案:
1. Channel: 使用channel控制子协程
2. WaitGroup : 使用信号量机制控制子协程
3. Context: 使用上下文控制子协程
三种方案各有优劣,比如Channel优点是实现简单,清晰易懂;WaitGroup优点是子协程个数动态可调整;Context 优点是对子协程派生出来的孙子协程的控制。缺点是相对而言的,要结合实例应用场景进行选择。
channel
channel一般用于协程之间的通信,channel也可以用于并发控制。
比如主协程启动N个子协程,主协程等待所有子协程退出后再继续后续流程,这种场景下channel也可轻易实现。
基础数据结构
src/runtime/chan.go: hchan 定义了channel的数据结构:
1 2 3 4 5 6 7 8 9 10 11 12 13 14 15 16 17 18 19 20 21 22 23 24 25 26 | type hchan struct { qcount uint // 当前队列中的元素个数 dataqsiz uint // 环形队列的长度,可存放的元素个数 buf unsafe.Pointer // 环形队列指针 elemsize uint16 // 每个元素的大小 closed uint32 // 关闭标识 elemtype *_type // 元素类型 sendx uint // 队列下标,指示元素写入时存放到队列中的位置 recvx uint // 队列下标,指示元素从队列的该位置读出 recvq waitq // 等待读消息的goroutine队列 sendq waitq // 等待写消息的goroutine队列 // 互斥锁,保护 hchan 中的所有字段 // 以及此通道上被阻塞的 sudogs 中的多个字段 // // 持有 lock 的时候,禁止更改另一个 G 的状态 // (特别是不要使 G 状态变成ready) // 因为这会因为堆栈 shrinking 而发生死锁 lock mutex // 内部互斥锁,保证channel的线程安全 } // 等待队列 type waitq struct { first *sudog last *sudog } |
从数据结构可以看出channel由队列、类型信息、goroutine等待队列、互斥锁等组成,下面分别说明其原理。
环形队列
chan内部实现了一个环形队列作为其缓冲区,队列的长度是创建chan时指定的。
1 | make(chan string, 10) |
下图展示了一个可缓存10个元素的channel示意图:
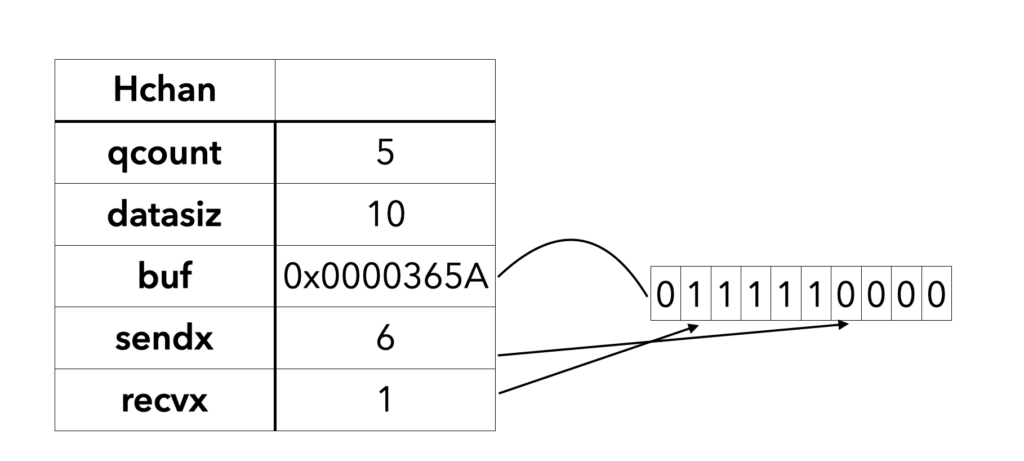
从图上可知队列中目前还有5个等待的goroutine,当前channel已经发生过读写。
dataqsiz指示了队列长度为10,即可缓存10个元素;
buf指向队列的内存,队列中还剩余5个元素;
qcount表示队列中还有5个元素;
sendx指示后续写入的数据存储的位置, 当前为6,
recvx指示从该位置读取数据, 当前为1。
等待队列
从channel读数据,如果channel缓冲区为空或者没有缓冲区,当前goroutine会被阻塞。
向channel写数据,如果channel缓冲区已满或者没有缓冲区,当前goroutine会被阻塞。
被阻塞的goroutine将会挂在channel的等待队列中:
因读阻塞的goroutine会被向channel写入数据的goroutine唤醒;
因写阻塞的goroutine会被从channel读数据的goroutine唤醒;
注意,一般情况下recvq和sendq至少有一个为空。只有一个例外,那就是同一个goroutine使用select语句向 channel一边写数据,一边读数据。
类型信息
一个channel只能传递一种类型的值,类型信息存储在hchan数据结构中。
elemtype代表类型,用于数据传递过程中的赋值;
elemsize代表类型大小,用于在buf中定位元素位置。
锁
一个channel同时仅允许被一个goroutine读写。
所以,经典问题,channel是线程安全的吗?channel是协程安全的吗?
答案是肯定是安全的,因为channel内部维护了一个互斥锁。
channel读写
创建channel
创建channel的过程实际上是初始化hchan结构。其中类型信息和缓冲区长度由make语句传入,buf的大小则与元素 大小和缓冲区长度共同决定。
创建调用代码:
1 2 | make(chan string, 10) // 创建缓冲区大小为10的channel make(chan string) // 创建缓冲区大小为0的channel,也就是无缓冲 |
创建channel源码:
1 2 3 4 5 6 7 8 9 10 11 12 13 14 15 16 17 18 19 20 21 22 23 24 25 26 27 28 29 30 31 32 33 34 35 36 37 38 39 40 41 42 43 44 45 46 47 48 | func makechan(t *chantype, size int) *hchan { elem := t.elem // compiler checks this but be safe. if elem.size >= 1<<16 { throw("makechan: invalid channel element type") } if hchanSize%maxAlign != 0 || elem.align > maxAlign { throw("makechan: bad alignment") } mem, overflow := math.MulUintptr(elem.size, uintptr(size)) // 这里处理过多或元素过大导致的溢出 if overflow || mem > maxAlloc-hchanSize || size < 0 { panic(plainError("makechan: size out of range")) } // Hchan does not contain pointers interesting for GC when elements stored in buf do not contain pointers. // buf points into the same allocation, elemtype is persistent. // SudoG's are referenced from their owning thread so they can't be collected. // TODO(dvyukov,rlh): Rethink when collector can move allocated objects. var c *hchan switch { case mem == 0: // Queue or element size is zero. c = (*hchan)(mallocgc(hchanSize, nil, true)) // Race detector uses this location for synchronization. c.buf = c.raceaddr() case elem.ptrdata == 0: // Elements do not contain pointers. // Allocate hchan and buf in one call. c = (*hchan)(mallocgc(hchanSize+mem, nil, true)) c.buf = add(unsafe.Pointer(c), hchanSize) default: // Elements contain pointers. c = new(hchan) c.buf = mallocgc(mem, elem, true) } c.elemsize = uint16(elem.size) // 元素大小 c.elemtype = elem // 元素类型 c.dataqsiz = uint(size) lockInit(&c.lock, lockRankHchan) if debugChan { print("makechan: chan=", c, "; elemsize=", elem.size, "; dataqsiz=", size, "\n") } return c } |
向channel写数据
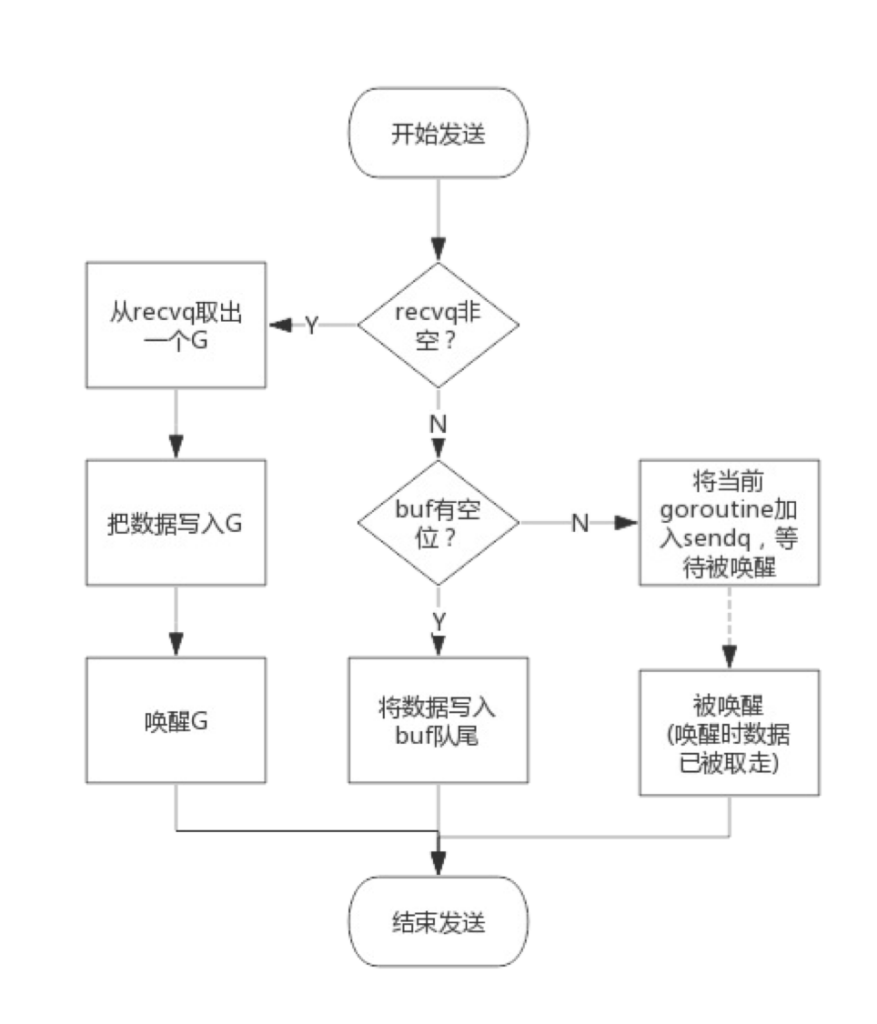
向一个channel中写数据简单过程如下:
1. 如果等待接收队列recvq不为空,说明缓冲区中没有数据或者没有缓冲区,此时直接从recvq取出G,并把数据写入,最后把该G唤醒,结束发送过程;
2. 如果缓冲区中有空余位置,将数据写入缓冲区,结束发送过程;
3. 如果缓冲区中没有空余位置,将待发送数据写入G,将当前G加入sendq,进入睡眠,等待被读goroutine唤醒;
简单流程图如下:
从channel读数据
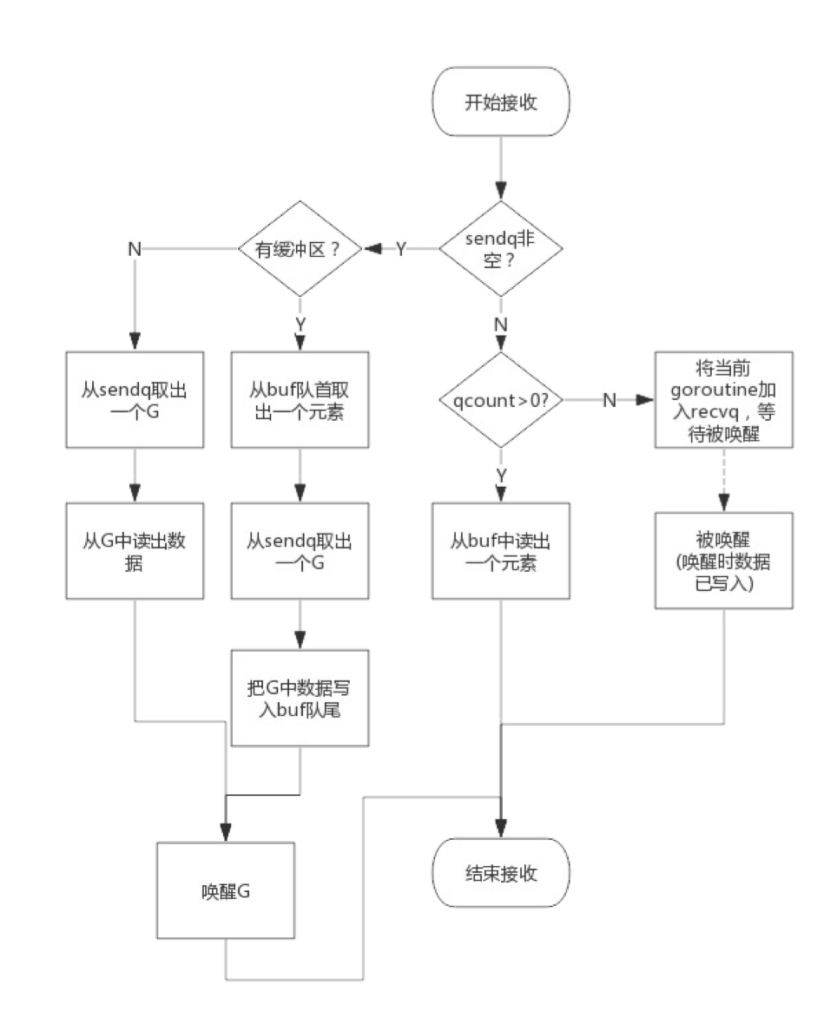
从一个channel读数据简单过程如下:
1. 如果等待发送队列sendq不为空,且没有缓冲区,直接从sendq中取出G,把G中数据读出,最后把G唤醒,结束 读取过程;
2. 如果等待发送队列sendq不为空,此时说明缓冲区已满,从缓冲区中首部读出数据,把G中数据写入缓冲区尾 部,把G唤醒,结束读取过程;
3. 如果缓冲区中有数据,则从缓冲区取出数据,结束读取过程;
4. 将当前goroutine加入recvq,进入睡眠,等待被写goroutine唤醒;
简单流程图如下:
关闭channel
关闭channel时会把recvq中的G全部唤醒,本该写入G的数据位置为nil。把sendq中的G全部唤醒,但这些G会panic。
除此之外,panic出现的常见场景还有:
1. 关闭值为nil的channel
2. 关闭已经被关闭的channel
3. 向已经关闭的channel写数据
常见用法
单向channel
单向channel指只能用于发送或接收数据,实际上也没有单向channel。
我们知道channel可以通过参数传递,所谓单向channel只是对channel的一种使用限制,这跟C语言使用const修饰函数参数为只读是一个道理。
func readChan(chanName <-chan string): 通过形参限定函数内部只能从channel中读取数据 func writeChan(chanName chan<- string): 通过形参限定函数内部只能向channel中写入数据 一个简单的示例程序:
1 2 3 4 5 6 7 8 9 10 11 12 13 14 15 16 17 18 19 20 | func main() { tempChannel := make(chan string, 10) writeChan(tempChannel) readChan(tempChannel) } func readChan(chanName <-chan string) { select { case param := <-chanName: println("Get param from chan:", param) default: println("未知操作") } } func writeChan(chanName chan<- string) { chanName <- "10086" } |
tempChannel是个正常的channel,而readChan()参数限制了传入的channel只能用来读,writeChan()参数限制了传 入的channel只能用来写。
select
使用select可以监控多channel,比如监控多个channel,当其中某一个channel有数据时,就从其读出数据。
示例代码:
1 2 3 4 5 6 7 8 9 10 11 12 13 14 15 16 17 18 19 20 21 22 23 24 25 26 27 28 29 | func main() { tempChannel1 := make(chan string, 10) tempChannel2 := make(chan string, 10) go func() { for i := 0; i < 100; i++ { if i%2 == 0 { writhChan(tempChannel1, strconv.Itoa(i)) } else { writhChan(tempChannel2, strconv.Itoa(i)) } time.Sleep(time.Second) } }() for { // 这里明明是个死循环,且select没有default语句,为什么不会崩溃?这个问题我们后续讨论。 select { case param := <-tempChannel1: println("Get param from channel 1:", param) case param := <-tempChannel2: println("Get param from channel 2:", param) } } } func writeChan(chanName chan<- string, param string) { chanName <- param } |
程序中创建两个channel: tempChannel1和tempChannel2。函数writeChan()函数会向两个channel中周期性写入数据。
通过select可以监控两个channel,任意一个可读时就从其中读出数据。
输出结果:
1 2 3 4 5 6 7 8 9 10 11 12 | Get param from channel 1: 0 Get param from channel 2: 1 Get param from channel 1: 2 Get param from channel 2: 3 Get param from channel 2: 5 Get param from channel 1: 4 Get param from channel 2: 7 Get param from channel 1: 6 Get param from channel 1: 8 Get param from channel 2: 9 Get param from channel 1: 10 ……………… |
从输出可见,从channel中读出数据的顺序是随机的,事实上select语句的多个case执行顺序是随机的,关于 select的实现原理也后面再分析。
通过这个示例想说的是:select的case语句读channel不会阻塞,尽管channel中没有数据。
这是由于case语句编 译后调用读channel时会明确传入不阻塞的参数,此时读不到数据时不会将当前goroutine加入到等待队列,而是直接返回。
range
通过range可以持续从channel中读出数据,好像在遍历一个数组一样,当channel中没有数据时会阻塞当前goroutine,与读channel时阻塞处理机制一样。
1 2 3 4 5 | func chanRange(chanName chan int) { for p := range chanName { println("Get param from channel: ", p) } } |
注意:如果向此channel写数据的goroutine退出时,系统检测到这种情况后会panic,否则range将会永久阻塞。
使用channel进行并发控制
下面的程序展示一个使用channel控制并发的案例:
1 2 3 4 5 6 7 8 9 10 11 12 13 14 15 16 17 18 19 20 21 22 23 24 25 26 27 28 29 30 31 32 33 | func main() { channels := make([]chan int, 10) //创建一个10个元素的切片,元素类型为channel for i := 0; i < 10; i++ { channels[i] = make(chan int) //切片中放入一个channel go WorkProcess(channels[i], i) //启动协程,传一个管道用于通信 } for _, ch := range channels { //遍历切片,等待子协程结束 <-ch EXIT: for { select { case value := <-ch: fmt.Println("Routine ", value, " quit!") break EXIT default: fmt.Println("loop trap") } } } fmt.Println("任务完成") beego.Run() } func WorkProcess(chanName chan int, index int) { fmt.Println(chanName) // do something chanName <- index // 假定往channel中写入了一个元素就代表任务完成 } |
上面的例子通过给每个协程创建一个对应的channel,用于跟父协程通信,所有的协程结束后父协程的读取阻塞也就结束了,从而达到控制并发的效果。
这种方法下需要创建很多的channel,而且对子协程内产生的孙协程控制非常不便,如需控制,可考虑使用context。
WaitGroup
信号量
信号量(Semaphore),有时被称为信号灯,是在多线程环境下使用的一种设施,是可以用来保证两个或多个关键代码段不被并发调用。
在进入一个关键代码段之前,线程必须获取一个信号量;一旦该关键代码段完成了,那么该线程必须释放信号量。
其它想进入该关键代码段的线程必须等待直到第一个线程释放信号量。
为了完成这个过程,需要创建一个信号量VI,然后将Acquire Semaphore VI以及Release Semaphore VI分别放置在每个关键代码段的首末端。
确认这些信号量VI引用的是初始创建的信号量。
可以将信号量理解为一个数值:
当信号量大于0时,表示资源可用,获取信号量时系统自动将信号量减1;
当信号量==0时,表示资源暂不可用,获取信号量时,当前线程会进入睡眠,当信号量为正时被唤醒;
由于WaitGroup在实现中也使用了信号量,这里简单提个背景。
数据结构
源码包中 src/sync/waitgroup.go:WaitGroup 定义了其数据结构:
1 2 3 4 5 6 | type WaitGroup struct { noCopy noCopy state atomic.Uint64 // high 32 bits are counter, low 32 bits are waiter count. sema uint32 } |
这里需要注意的是noCopy是一个结构体,并且实现了Locker接口,用于禁止对WaitGroup进行值拷贝。
这个机制并不影响编译和运行,但如果有代码试图对WaitGroup进行复制,则会在编译的时候报错。
1 2 3 4 5 6 7 8 9 10 | // noCopy may be embedded into structs which must not be copied // after the first use. // // See https://golang.org/issues/8005#issuecomment-190753527 // for details. type noCopy struct{} // lock is a no-op used by -copylocks checker from `go vet`. func (*noCopy) lock() {} func (*noCopy) unlock() {} |
state:原子的无符号64位整形,高32位存储的是当前还未执行结束的goroutine计数器;低32位存储等待goroutine-group结束的goroutine数量,即有多少个等候者
sema:对应于 golang 中 runtime 内部的信号量的实现。
WaitGroup 中会用到 sema 的两个相关函数,runtime_Semacquire 和 runtime_Semrelease。
runtime_Semacquire 表示增加一个信号量,并挂起 当前 goroutine
。runtime_Semrelease 表示减少一个信号量,并唤醒 sema 上其中一个正在等待的 goroutine。
WaitGroup 的整个调用过程可以简单地描述成下面这样:
当调用 WaitGroup.Add(n) 时,counter 将会自增: state := wg.state.Add(uint64(delta) << 32) 当调用 WaitGroup.Wait() 时,会将 waiter++。同时调用 runtime_Semacquire(semap), 增加信号量,并挂起当前 goroutine。 当调用 WaitGroup.Done() 时,将会 counter--。如果自减后的 counter 等于 0,说明 WaitGroup 的等待过程已经结束,则需要调用 runtime_Semrelease 释放信号量,唤醒正在 WaitGroup.Wait 的 goroutine。
使用WaitGroup进行并发控制
前面我们讲了WaitGroup的数据结构和原理,接下来用一个实例演示如何使用使用WaitGroup进行并发控制。
1 2 3 4 5 6 7 8 9 10 11 12 13 14 15 16 | wg := sync.WaitGroup{} wg.Add(10) for i := 0; i < 10; i++ { go func(index int) { time.Sleep(time.Duration(index) * time.Second) wg.Done() fmt.Println("goroutine done", index) }(i) } wg.Wait() fmt.Println("Finished wait") |
上面的代码中wg内部维护了一个计数器:
1. 启动goroutine前将计数器通过Add(10)将计数器设置为待启动的goroutine个数。
2. 启动goroutine后,使用Wait()方法阻塞自己,等待计数器变为0。
3. 每个goroutine执行结束通过Done()方法将计数器减1。
4. 计数器变为0后,阻塞的goroutine被唤醒。
通过上面的代码,可以很简单的实现等待一组goroutine执行结束后再执行后续任务。
需要注意的是:
1. Add(delta)操作必须早于Wait()调用,否则会panic。
2. Add(delta)delta数值必须等于调用Done()的总次数,否则会panic。
3. WaitGroup可以实现更多层级的等待完成后执行,但前提是必须要知道所有需要等待的任务数并设置delta,如下代码所示。
1 2 3 4 5 6 7 8 9 10 11 12 13 14 15 16 17 18 19 20 21 22 23 | wg := sync.WaitGroup{} wg.Add(20) for i := 0; i < 10; i++ { go func(index int) { time.Sleep(time.Duration(index) * time.Second) wg.Done() fmt.Println("child goroutine done", index) go func(index int) { time.Sleep(time.Second) wg.Done() fmt.Println("grandson goroutine done", index) }(index) }(i) } wg.Wait() fmt.Println("Finished wait") |
从执行结果可以看出,确实能够满足要求,但实现看起来非常的不优雅。这个时候我们可以考虑使用context来实现。
Context
Golang context是Golang应用开发常用的并发控制技术,它与WaitGroup最大的不同点是context对于派生goroutine有更强的控制力,它可以控制多级的goroutine。
context翻译成中文是”上下文”,即它可以控制一组呈树状结构的goroutine,每个goroutine拥有相同的上下文。
典型的使用场景如下图所示:
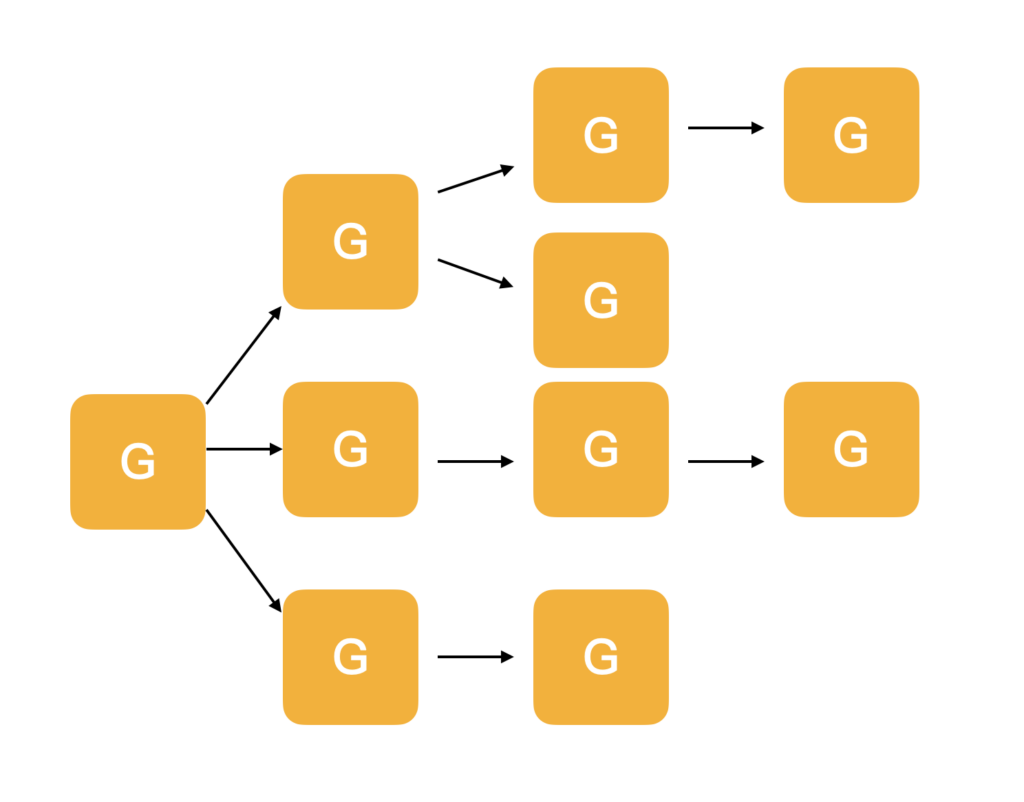
上图中由于goroutine派生出子goroutine,而子goroutine又继续派生新的goroutine,这种情况下使用 WaitGroup就不太容易,因为子goroutine个数不容易确定。
而使用context就可以很容易实现。
数据结构
源码包中 src/context/context.go:Context 定义了该接口:
1 2 3 4 5 6 7 8 9 | type Context interface { Deadline() (deadline time.Time, ok bool) Done() <-chan struct{} Err() error Value(key any) any } |
从源码可知,Context实际上只定义了接口,凡是实现该接口的类都可称为是一种context,官方包中实现了几个常用的Context,分别可用于不同的场景。
基础Context接口定义了4个方法:
Deadline() (deadline time.Time, ok bool)
该方法返回一个deadline和标识是否已设置deadline的bool值,如果没有设置deadline,则ok == false,此 时deadline为一个初始值的time.Time值
Done() <-chan struct{}
该方法返回一个channel,需要在select-case语句中使用,如”case <-context.Done():”。 当context关闭后,Done()返回一个被关闭的管道,关闭的管理仍然是可读的,据此goroutine可以收到关闭请 求;当context还未关闭时,Done()返回nil。
Err() error
该方法描述context关闭的原因。关闭原因由context实现控制,不需要用户设置。
比如Deadline context,关闭原因可能是因为deadline,也可能提前被主动关闭,那么关闭原因就会不同:
因deadline关闭:“context deadline exceeded”;
因主动关闭: “context canceled”。
当context关闭后,Err()返回context的关闭原因;当context还未关闭时,Err()返回nil;
Value(key any) any
有一种context,它不是用于控制呈树状分布的goroutine,而是用于在树状分布的goroutine间传递信息。
Value()方法就是用于此种类型的context,该方法根据key值查询map中的value。具体使用后面示例说明。
空Context
空Context用于Context的根节点,空Context只是实现了接口,但是并没有任何过期时间,错误等值数据,仅用于其他Context的父节点。
在go源码中定义了两个空Context,Background和TODO,从源码可知,他们本质上就是emptyCtx。
1 2 3 4 5 6 7 8 9 10 11 12 13 14 15 16 17 18 19 20 21 22 23 24 25 26 27 28 29 30 31 32 33 34 35 36 37 38 39 40 41 42 | // An emptyCtx is never canceled, has no values, and has no deadline. It is not // struct{}, since vars of this type must have distinct addresses. type emptyCtx int func (*emptyCtx) Deadline() (deadline time.Time, ok bool) { return } func (*emptyCtx) Done() <-chan struct{} { return nil } func (*emptyCtx) Err() error { return nil } func (*emptyCtx) Value(key any) any { return nil } func (e *emptyCtx) String() string { switch e { case background: return "context.Background" case todo: return "context.TODO" } return "unknown empty Context" } var ( background = new(emptyCtx) todo = new(emptyCtx) ) func Background() Context { return background } func TODO() Context { return todo } |
context包提供了5个方法创建不同类型的context,使用这5个方法时如果没有父context,都需要传入 Backgroud或者TODO,即Backgroud或TODO作为其父节点:
WithCancel()
WithCancelCause()
WithDeadline()
WithTimeout()
WithValue()
context包中实现Context接口的struct,除了emptyCtx外,还有cancelCtx、timerCtx和valueCtx三种,正是基于这三种context实例,实现了上述5种类型的context。
cancelCtx
1 2 3 4 5 6 7 8 9 10 11 | // A cancelCtx can be canceled. When canceled, it also cancels any children // that implement canceler. type cancelCtx struct { Context mu sync.Mutex // protects following fields done atomic.Value // of chan struct{}, created lazily, closed by first cancel call children map[canceler]struct{} // set to nil by the first cancel call err error // set to non-nil by the first cancel call cause error // set to non-nil by the first cancel call } |
children中记录了由此context派生的所有child,此context被cancle时会把其中的所有child都cancel掉。
WithCancel()
WithCancelCause()
两个方法生成的都是cancelCtx,区别在于WithCancelCause可以传入CancelCauseFunc来方便的管理取消原因。
cancelCtx的典型使用场景
1 2 3 4 5 6 7 8 9 10 11 12 13 14 15 16 17 18 19 20 21 22 23 24 25 26 27 28 29 30 31 32 33 34 35 36 37 38 39 40 41 42 43 44 45 46 47 48 49 50 51 52 53 54 55 56 57 58 59 60 61 62 63 64 65 66 67 68 69 70 71 72 73 74 75 76 77 78 79 | func main() { ctx, cancel := context.WithCancelCause(context.Background()) defer cancel(errors.New("main goroutine done, cancel")) go HandelRequest(ctx) time.Sleep(5 * time.Second) fmt.Println("Wait 5 seconds, cancel all uncompleted goroutines.") cancel(errors.New("wait 5 seconds, cancel")) time.Sleep(10 * time.Second) } func HandelRequest(ctx context.Context) { go WriteRedis(ctx) go WriteDatabase(ctx) for { select { case <-ctx.Done(): if len(context.Cause(ctx).Error()) > 0 { fmt.Println("HandelRequest canceled cause:", context.Cause(ctx)) } else { fmt.Println("HandelRequest canceled:", ctx.Err()) } return default: fmt.Println("HandelRequest running") time.Sleep(500 * time.Millisecond) } } } func WriteRedis(ctx context.Context) { for { select { case <-ctx.Done(): if len(context.Cause(ctx).Error()) > 0 { fmt.Println("WriteRedis canceled cause:", context.Cause(ctx)) } else { fmt.Println("WriteRedis canceled:", ctx.Err()) } return default: fmt.Println("WriteRedis start") time.Sleep(time.Second * 3) fmt.Println("WriteRedis done, cost 3 seconds.") return } } } func WriteDatabase(ctx context.Context) { canceled := atomic.Bool{} canceled.Store(false) go func() { signal := <-ctx.Done() if len(context.Cause(ctx).Error()) > 0 { fmt.Println("WriteDatabase canceled cause:", context.Cause(ctx)) } else { fmt.Println("WriteDatabase canceled:", ctx.Err()) } canceled.Store(true) fmt.Println(signal) }() fmt.Println("WriteDatabase start") for i := 0; i < 10; i++ { time.Sleep(time.Second) if canceled.Load() { fmt.Println("WriteDatabase task canceled, return") return } } fmt.Println("WriteDatabase done, cost 10 seconds.") } |
上面代码中协程HandelRequest()用于处理某个请求,其又会创建两个协程:WriteRedis()、 WriteDatabase(),main协程创建创建context,并把context在各子协程间传递,main协程在适当的时机可以 cancel掉所有子协程。
程序输出如下所示:
1 2 3 4 5 6 7 8 9 10 11 12 13 14 15 16 17 18 | HandelRequest running WriteDatabase start WriteRedis start HandelRequest running HandelRequest running HandelRequest running HandelRequest running HandelRequest running WriteRedis done, cost 3 seconds. HandelRequest running HandelRequest running HandelRequest running HandelRequest running Wait 5 seconds, cancel all uncompleted goroutines. WriteDatabase canceled cause: wait 5 seconds, cancel {} WriteDatabase task canceled, return HandelRequest canceled cause: wait 5 seconds, cancel |
从运行结果可知,我们在派生出的goroutine中接收到来自done channel的新号后,可以对任务做出相应的取消操作。
timerCtx
1 2 3 4 5 6 | type timerCtx struct { *cancelCtx timer *time.Timer // Under cancelCtx.mu. deadline time.Time } |
从上面的源码可以看出timerCtx在cancelCtx基础上增加了deadline用于标示自动cancel的最终时间,而timer就是一个触发自动 cancel的定时器。
由此,衍生出WithDeadline()和WithTimeout()。
实现上这两种类型实现原理一样,只不过使用语境不一样:
deadline: 指定最后期限,比如context将2023.7.7 21:00:00之时自动结束
timeout: 指定最长存活时间,比如context将在30s后结束。
对于接口来说,timerCtx在cancelCtx基础上还需要实现Deadline()和cancel()方法,其中cancel()方法是重写的。
timerCtx典型使用案例
这里的例子跟上面cancelCtx的代码大体类似,只不过这里不需要手动取消了,当deadline到达后会自动触发cancel操作来取消未完成的操作。
1 2 3 4 5 6 7 8 9 10 11 12 13 14 15 16 17 18 19 20 21 22 23 24 25 26 27 28 29 30 31 32 33 34 35 36 37 38 39 40 41 42 43 44 45 46 47 48 49 50 51 52 53 54 55 56 57 58 59 60 61 62 63 64 65 66 67 68 69 70 71 72 | func main() { // ctx, _ := context.WithTimeout(context.TODO(), time.Second*5) ctx, _ := context.WithDeadline(context.Background(), time.Now().Add(time.Second*5)) // 这一句跟上面注释的一句其实是一个意思 go HandelRequest(ctx) time.Sleep(10 * time.Second) } func HandelRequest(ctx context.Context) { go WriteRedis(ctx) go WriteDatabase(ctx) for { select { case <-ctx.Done(): if len(context.Cause(ctx).Error()) > 0 { fmt.Println("HandelRequest canceled cause:", context.Cause(ctx)) } else { fmt.Println("HandelRequest canceled:", ctx.Err()) } return default: fmt.Println("HandelRequest running") time.Sleep(500 * time.Millisecond) } } } func WriteRedis(ctx context.Context) { for { select { case <-ctx.Done(): if len(context.Cause(ctx).Error()) > 0 { fmt.Println("WriteRedis canceled cause:", context.Cause(ctx)) } else { fmt.Println("WriteRedis canceled:", ctx.Err()) } return default: fmt.Println("WriteRedis start") time.Sleep(time.Second * 3) fmt.Println("WriteRedis done, cost 3 seconds.") return } } } func WriteDatabase(ctx context.Context) { canceled := atomic.Bool{} canceled.Store(false) go func() { signal := <-ctx.Done() if len(context.Cause(ctx).Error()) > 0 { fmt.Println("WriteDatabase canceled cause:", context.Cause(ctx)) } else { fmt.Println("WriteDatabase canceled:", ctx.Err()) } canceled.Store(true) fmt.Println(signal) }() fmt.Println("WriteDatabase start") for i := 0; i < 10; i++ { time.Sleep(time.Second) if canceled.Load() { fmt.Println("WriteDatabase task canceled, return") return } } fmt.Println("WriteDatabase done, cost 10 seconds.") } |
输出结果:
1 2 3 4 5 6 7 8 9 10 11 12 13 14 15 16 17 | HandelRequest running WriteRedis start WriteDatabase start HandelRequest running HandelRequest running HandelRequest running HandelRequest running HandelRequest running WriteRedis done, cost 3 seconds. HandelRequest running HandelRequest running HandelRequest running HandelRequest running WriteDatabase canceled cause: context deadline exceeded {} WriteDatabase task canceled, return HandelRequest canceled cause: context deadline exceeded |
valueCtx
源码:
1 2 3 4 | type valueCtx struct { Context key, val any } |
valueCtx只是在Context基础上增加了一个key-value对,用于在各级协程间传递一些数据。
由于valueCtx既不需要cancel,也不需要deadline,那么只需要实现Value()接口即可。
valueCtx使用案例
这里将上面timeerCtx改造一下,使用valueCtx做parent即可在满足超时取消的同时携带操作到子goroutine。
1 2 | parentCtx := context.WithValue(context.TODO(), "data", map[string]string{"UserID": "10086"}) ctx, _ := context.WithDeadline(parentCtx, time.Now().Add(time.Second*5)) |
总结
1. 使用channel来控制子协程的优点是实现简单,缺点是当需要大量创建协程时就需要有相同数量的channel,而且对于子协程继续派生出来的协程不方便控制。
2. 在已知需要等待的协程数量时,使用WaitGroup可以很方便的控制等待完成后进行下一步操作。
3. WaitGroup.Add()操作必须早于WaitGroup.Wait(), 否则会panic。
4. WaitGroup.Add()设置的delta值必须与实际等待的goroutine个数一致,否则会panic。
5. Context仅仅是一个接口定义,跟据实现的不同,可以衍生出不同的context类型。
6. cancelCtx实现了Context接口,通过WithCancel()和WithCancelCause()创建cancelCtx实例.
7. timerCtx实现了Context接口,通过WithDeadline()和WithTimeout()创建timerCtx实例。
8. valueCtx实现了Context接口,通过WithValue()创建valueCtx实例。
9. 三种context实例可互为父节点,从而可以组合成不同的应用形式。
程序猿老龚(龚杰洪)原创,版权所有,转载请注明出处.
弋莼窝庥煺诰
非常好,再次评论一下